Seeing! A Little reference please.

old trucks

old trucks

Seeing. It’s what we artist do.  It’s how we create. We’re especially good at observing and turning our observations into art.  Reference Photos is my next tutorial on really seeing rather than just looking.

As Referred To:  As I’m starting a new painting it’s important to me to have reference photos, especially when I can’t go out to see the real thing when I’m ready to work.  I keep reference files on my computer and print out the ones that I feel are pertinent to the design I’m creating.    Read more…

Watercolor Mooooo….

I’ve been playing around with a watercolor technique where I reduce a photo down to black and white, increase contrast to the max, and just have fun with washes.  I was pleased my with cow design from a photo that my husband had taken.  Here is the original photo so you can see some of my progression.

I plan to make a video of this design and offer it on Creative Workshops.

You can see this photo on Rick’s web site plus many more of his art photos.

Cow by Rick Watd

Cow by Rick Watd

Cow black and white by Rick Ward

Cow black and white by Rick Ward

Cow Abstract watercolor

Cow Abstract watercolor


A Halloween Treat!!

Happy Halloweeeeeeeeeeeeeeen!

It’s a beautiful fall day with colorful trees and very pleasant weather here today.  It’s a perfect Halloween eve.

I have a Halloween treat for you. It’s directions for my spooky owl pen.

Spooky Owl Pin    A Liz Miller CDA design

You can use your favorite colors but here are some of the ones that I’ve used:

DecoArt Americana: Lamp Black, Raw Umber, Butterscotch, Warm White, Marigold, Irish Moss, Tangerine, and Burnt Sienna.

The blank is available at my studio or you can order from Viking Woodcrafts if you can’t drop by my studio.
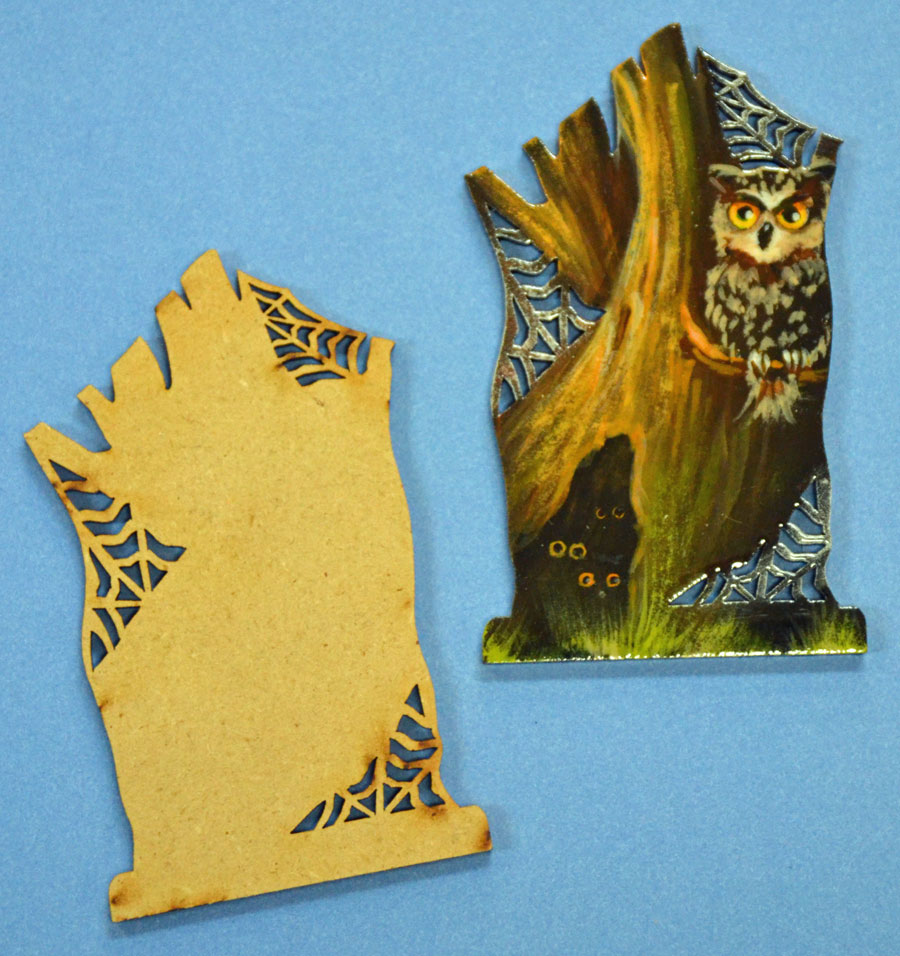
Spooky Owl Pin

Spooky Owl Pin

Let’s Paint a Spooky Owl in a Tree:

I used a flat Bringle Blender to scuff in the tree using the chisel edge of the brush and RU.  Then use Butterscotch and a very little Butterscotch + WW to lighten the left side of the trunk and branches. I then added a little scuffed in Tangerine to accent the light side and middle of trunk.  Use a side loaded flat to darken the right side of trunk with Black. Of course the hole in the base of the tree is painted black.  The spider webs are also painted black.  Dry and then pattern your owl.

Using a #0 liner dab in the owl with RU to create fluffy feathers.  Begin to fluff in the lighter feathers by adding WW to your dirty brush. Notice the light feather on the face and details on the head and body. Don’t forget the tail feathers.  Lighten the face by adding more WW to your dirty brush.  Eyes are Marigold and shaded at the top with BS when dry. Outline them with RU.  Pupils are black with a WW glint.  Beak is RU with a WW glint.  I added a little dabbed in BS under the chin and at the base of the tail.  Add a few WW claws to hold onto the branch that you add with your tree colors.  Add any other owl like detail that you would like.

To finish up dry brush a little WW on the spider webs and touch in some Tangerine eyes inside the hollow of the tree with black pupils and WW glints.  I then flick up some grass at the base of the tree with Irish Moss, a nice spooky bright green color, using my flat blender.

Dry and spray with DecoArt Triple Thick spray several times allowing plenty of dry time between sprays. Remember not to touch the varnish to check dryness unless you would like to leave a nice finger print for later ID purposes.  When dry glue a pin back to your painted treasure and enjoy wearing.

pattern

pattern

Have a spooky time painting this project.  We still have some fall season to enjoy this little pen.

You are welcome to teach this design but be sure to give me credit for the design.

Watch for a winter version of this design coming up soon!

Liz

We’re Having a Blog Party for Our New Creative Workshops Site

Have you every been to a blog party? Well this will be my first one. Our new, wonderful Creative Workshops site where I have my on line classes, along with many other terrific teachers, is have a grand opening blog party. If you participate you could be the fortunate winner or one or more free classes.

Mastering Decorative Painting Basics part 3

Mastering Decorative Painting Basics part 3

Each teacher is giving away one of their classes for free to a lucky commenter!

The way to win is to leave a comment on any teacher’s blog post with this message. You’ll will be entered for a random drawing for a free class from that teacher.

The idea of the list is that you can follow the party trail from blog to blog, leaving a comment on each blog you visit, therefore increasing your chances of winning a free class from one of the teachers you leave a comment for! Now how cool is that?!

Every class giveaway will be different because the teachers are generously each giving away one of their own classes. Gosh, maybe a really lucky commenter could win multiple free classes!! Now THAT

would be awesome for the winner wouldn’t it!  Stranger things have been known to happen. 🙂

My free is class is actually all three of my Mastering the Basics of Decorative Painting classes!  You get the whole series.

See my on line classes.

To win the opportunity for a free class from me you must leave a comment on this post and only this post. It helps me keep track of everyone. The party runs Sept. 23-Sept.29. I will use a random number generator to choose the lucky winner and announce the name Monday Sept 30.

Once you leave your comment on my post then from the list below choose the next blog you have not visited and leave a comment on their blog post. Each blog will have this list so you can move through the party leaving your trails of comments everywhere and increasing your chances of a FREE CLASS!

Go, go, go…tell your friends!!!!

COME VIST US DURING THE BLOG PARTY!

This is a fabulous list!

Sara Naumann

Cat Kerr

Jodi Ohl 

Nancy Lefko

Cathy Bluteau

Mechelle Harrison

Elizabeth Johnson

Terri Heinz

Gaye Medbury

Dawn Meisch

Ann Butler

Gail Schmidt

Marilyn Harris-Mills

Nellie Wortman

Martha Lever

Practice Tips For Strokes and Line Work:

Practice Tip For Strokes and Line Work:

Stroke practice

Stroke practice

It’s more fun to practice stroke work if you give yourself the project of creating different stroke borders. Each time come up with a different border using various brushes, strokes, and embellishments. Save these borders as future reference. Explore your creativity with borders and stroke embellishments.

You can use any paper for practicing your strokes and line work.  Some paper is very porous and has a lot of drag to it so just use plenty of paint.

One good idea for practicing is to use “write on” transparency film which you can find at any office supply store.  The film will stroke very smoothly and you can just wipe the paint off if you do this before it dries.  If you would like to save your practice for reference all it to dry.  These sheets will fit into sheet protectors to keep in a notebook.

Transparency film is good for trying out colors or placement for something like a ribbon or a stroke border.  Place the film over your surface, paint with a possible choice of color or technique, and see if you like it or want to try something different.

Enjoy practicing.

Liz

Going to the Beach

The sea breeze must be reaching all the way to the Triangle because we’ve had lots of painters registering for our beach related classes. I’m right there with the rest of you, dreaming of some leisure

Beach Time 3 hr workshop

Beach Time
3 hr workshop

time at the beach.

The Beach Time, 3 hr workshop has been quite popular, and we have painters attending the day class and more for the evening class. What can be more fun that painting the coast.  No prior experience is needed but also fun for those of you who already paint.

Register now!

In Cary we’re getting ready to paint one of Ros Stallcup’s wharf designs with a long fishing pier on a misty coast.  Ros is a master at coastal themed paintings. Always fun for us to paint too.

Wharf A Ros Stallcup design

Wharf
A Ros Stallcup design

Register now!


I have just finished the colored pencil design for our workshop on May 15.  We’re “painting” one of Janelle Johnson’s Great Blue Heron. It was lots of fun and an excellent basic colored pencil lesson. We’ll learn the basic strokes and blending while creating a fun piece of art.  If you’ve wanted to try colored pencil join us for some new techniques.

Register now!

Great Blue Heron Colored Pencil a Janelle Johnson design

Great Blue Heron
Colored Pencil
a Janelle Johnson design

Ros’ paintings are at the studio for you to see.  And they look like so much fun to paint.  Ros designed these just for us and we’ll be the first to paint them. Registration is open for the July whole week or single days. I have our surfaces for purchase and have you prep ready for you. Register for Ros’ seminar now.

We have lots more exciting workshops and classes starting soon, so plan to join us at Artful Endeavors.  Visit our class schedule pages to see more information.  All classes except our Tue evening Cary class are held in our Raleigh studio on Sawmill Rd.

Come paint with us!

Liz